Canary release
This tutorial shows how Iter8 can be used to release a basic Kubernetes application using a canary release strategy.
In a canary release, inference requests that match a particular pattern, for example those that have a particular header, are directed to the candidate version of the model. The remaining requests go to the primary, or initial, version of the model.
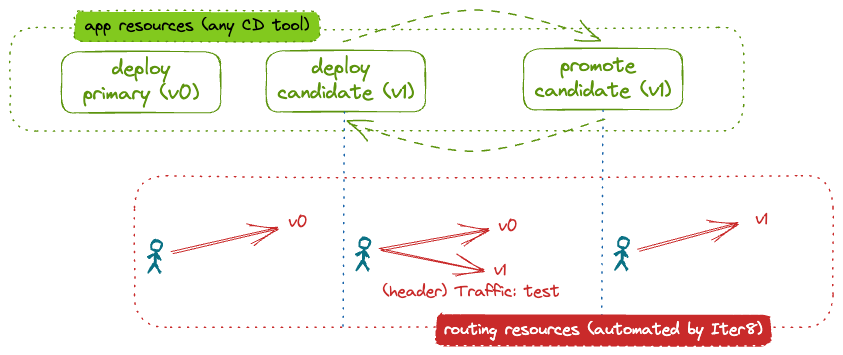
The user declaratively describes the desired application state at any given moment. An Iter8 release chart assists users who describe the application state at any given moment. The chart provides the configuration needed for Iter8 to automatically deploy application versions and configure the routing to implement the canary release strategy.
This tutorial uses the Kubernetes Gateway API to allow the use any service mesh that supports this API. In this case, we use demonstrate with Linkerd.
Before you begin
- Ensure that you have a Kubernetes cluster and the
kubectlandhelmCLIs. If using a local cluster (for example, Kind or Minikube), we recommend providing the cluster with at least 16GB of memory. - Install Linkerd.
Install the Iter8 controller
Iter8 can be installed and configured to watch resources either in a single namespace (namespace-scoped) or in the whole cluster (cluster-scoped).
helm install --repo https://iter8-tools.github.io/iter8 --version 1.1 iter8 controller
helm install --repo https://iter8-tools.github.io/iter8 --version 1.1 iter8 controller \
--set clusterScoped=true
For additional install options, see Iter8 Installation.
Deploy initial version
Deploy the initial version of the application (httpbin) using the Iter8 release chart by identifying the environment into which it should be deployed, a list of the versions to be deployed (only one here), and the release strategy to be used. Note that we deploy the application to the namespace test.
About creating a namespace for Linkerd deployments
When creating a namespace, it should be annotated so that all created pods are injected with the Linkerd proxy. This can be done, for example, by using the Linkerd CLI:
kubectl create ns test --dry-run=client -o yaml | linkerd inject - | kubectl apply -f -
cat <<EOF | helm -n test upgrade --install httpbin --repo https://iter8-tools.github.io/iter8 release --version 1.1 -f -
environment: deployment-gtw
application:
  versions:
  - metadata:
      labels:
        app.kubernetes.io/version: v0
    image: kennethreitz/httpbin
  strategy: canary
EOF
What happens?
The environment defines what kind of application is deployed. In this case (deployment-gtw), a Deployment and a Service object are created. - The namespace default is inherited from the Helm release namespace since it is not specified in the version or in application.metadata. - The name httpbin-0 is derived from the Helm release name since it is not specified in the version or in application.metadata. The name is derived by appending the index of the version in the list of versions; -0 in this case. - Alternatively, a deploymentSpecification and/or a serviceSpecification could have been specified.
To support routing, a Service (httpbin) is deployed. The name is the Helm release name since it not specified in application.metadata. Further, an Iter8 routemap is created.
Once the application components are ready, the Iter8 controller automatically configures the routing by creating an HTTPRoute. It is configured to route all traffic to the only deployed version, httpbin-0.
Verify routing
You can verify the routing configuration by inspecting the HTTPRoute:
kubectl -n test get httproute.gateway.networking.k8s.io httpbin -o yaml
You can also send requests from a pod within the cluster:
-
Create a
sleeppod in the cluster from which requests can be made:export SERVICE_MESH=linkerd curl -s https://raw.githubusercontent.com/iter8-tools/docs/v0.18.4/samples/kserve-serving/sleep.sh | sh - -
Exec into the sleep pod:
kubectl exec --stdin --tty "$(kubectl get pod --sort-by={metadata.creationTimestamp} -l app=sleep -o jsonpath={.items..metadata.name} | rev | cut -d' ' -f 1 | rev)" -c sleep -- /bin/sh -
To send requests without the header
traffic:curl httpbin.test -s -D - | grep -e '^HTTP' -e app-version -
Requests can also be sent with the header
traffic: test. When a candidate is deployed, requests with this header will be routed to the candidate. When no candidate is deployed, all requests will be routed to the primary version.curl httpbin.test -H 'traffic: test' -s -D - | grep -e '^HTTP' -e app-version
The output includes the version of the application that responded (in the app-version response header). In this example:
HTTP/1.1 200 OK
app-version: httpbin-0
Deploy candidate
A candidate can deployed by simply adding a second version to the list of versions comprising the application:
cat <<EOF | helm -n test upgrade --install httpbin --repo https://iter8-tools.github.io/iter8 release --version 1.1 -f -
environment: deployment-gtw
application:
  versions:
  - metadata:
      labels:
        app.kubernetes.io/version: v0
    image: kennethreitz/httpbin
  - metadata:
      labels:
        app.kubernetes.io/version: v1
    image: kennethreitz/httpbin
    matches:
    - headers:
      - name: traffic
        value: test
  strategy: canary
EOF
About the candidate version
In this tutorial, the candidate image is the same as the one for the primary version. In a real world example, it would be different. The version label (app.kubernetes.io/version) can be used to distinguish between versions.
When the second version is deployed and ready, the Iter8 controller automatically reconfigures the routing so that requests with the header traffic set to test will be sent to the candidate. All other requests will be sent to the primary version.
Verify routing
You can verify the routing configuration by inspecting the HTTPRoute and/or by sending requests as described above. Those with header traffic set to test will be handled by the candidate version:
HTTP/1.1 200 OK
app-version: httpbin-1
All others will be handled by the primary version:
HTTP/1.1 200 OK
app-version: httpbin-0
Promote candidate
The candidate can be promoted by redefining the primary version and removing the candidate:
cat <<EOF | helm -n test upgrade --install httpbin --repo https://iter8-tools.github.io/iter8 release --version 1.1 -f -
environment: deployment-gtw
application:
  versions:
  - metadata:
      labels:
        app.kubernetes.io/version: v1
    image: kennethreitz/httpbin
  strategy: canary
EOF
What is different?
The version label (app.kubernetes.io/version) of the primary version was updated. In a real world example, the image would also have been updated (with that from the candidate version).
Once the (reconfigured) primary version ready, the Iter8 controller will automatically reconfigure the routing to send all requests to it.
Verify routing
You can verify the routing configuration by inspecting the HTTPRoute and/or by sending requests as described above. They will all be handled by the primary version. Output will be something like:
HTTP/1.1 200 OK
app-version: httpbin-0
Cleanup
Delete the application and its routing configuration:
helm -n test delete httpbin
If you used the sleep pod to generate load, remove it:
kubectl delete deploy sleep
Uninstall Iter8 controller:
helm delete iter8
For additional uninstall options, see Iter8 Uninstall.