Automated Experiments: AutoX
AutoX, short for "automated experiments", allows Iter8 to detect changes to your Kubernetes resources objects and automatically start new experiments, allowing you to test your services as soon as you release a new version.
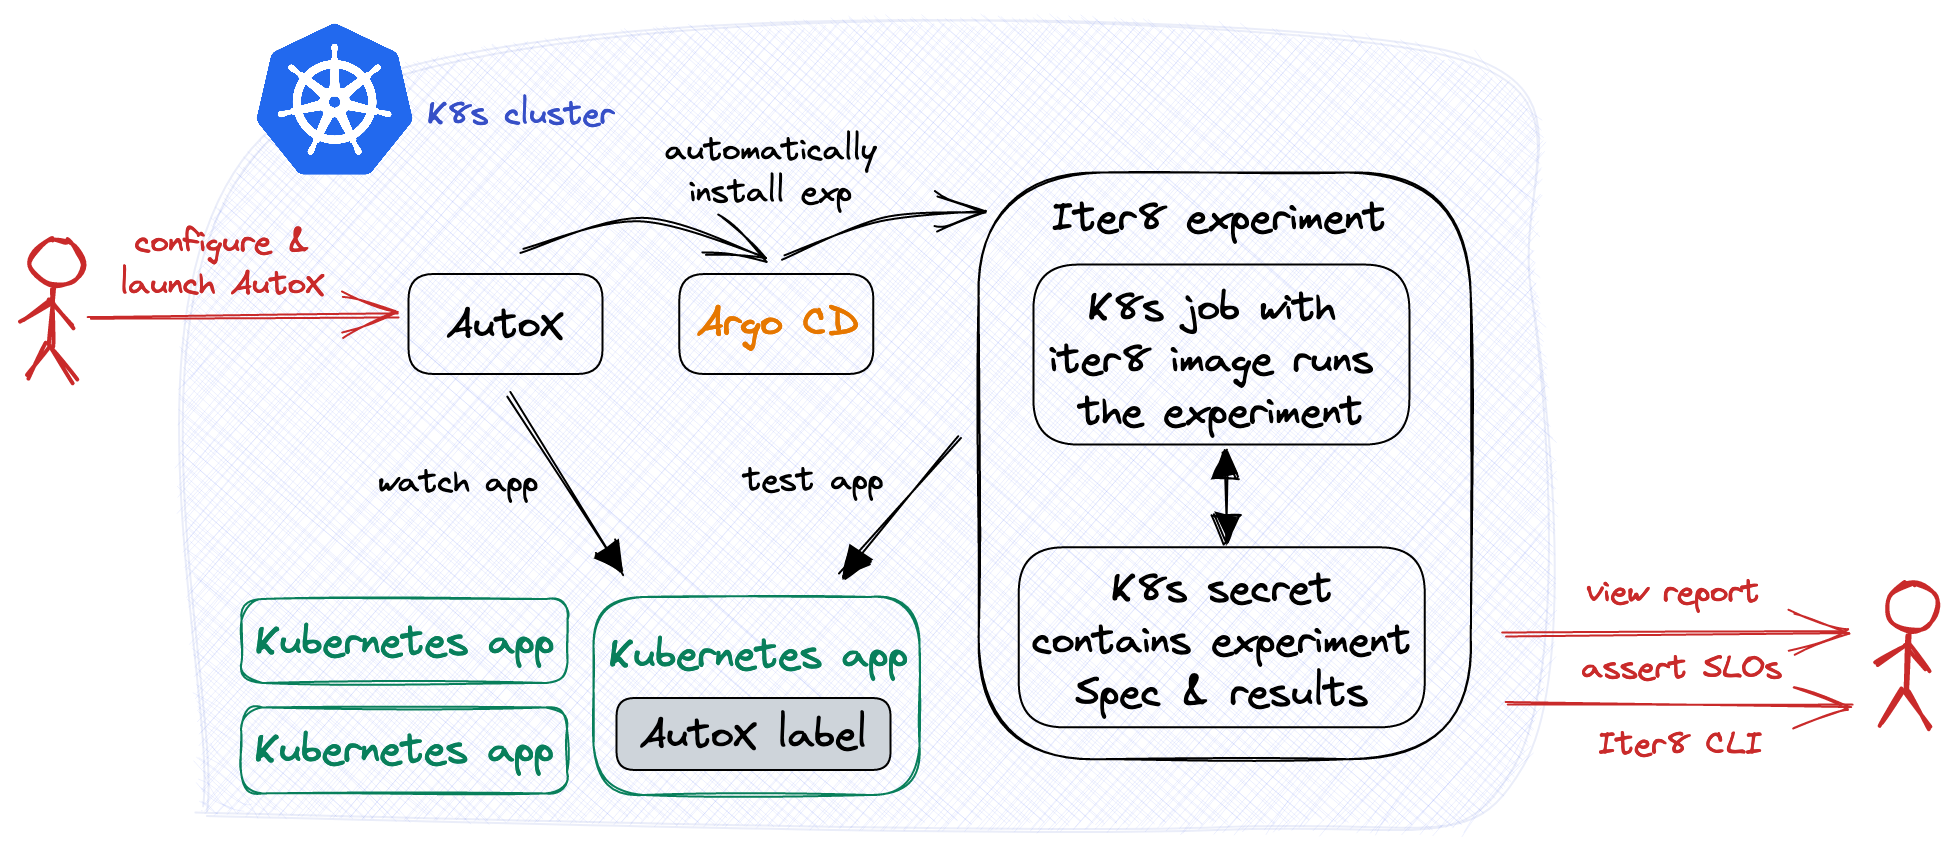
Releasing a new version of an application typically involves the creation of new Kubernetes resource objects and/or updates to existing ones. AutoX can be configured to watch for such changes and automatically launch new experiments. You can configure AutoX with multiple experiment groups and, for each group, specify the Kubernetes resource object that AutoX will watch and one or more experiments to be performed in response to new versions of this object.
Let us now see this in action using a Kubernetes HTTP service and configuring AutoX so that whenever a new version of the service is released, AutoX will start a new HTTP performance test that will validate if the service meets latency and error-related requirements.
Before you begin
- Try your first experiment. Understand the main concepts behind Iter8 experiments.
Setup Kubernetes cluster with ArgoCD
AutoX uses Argo CD, a popular continuous delivery tool, in order to launch the experiments.
A basic install of Argo CD can be done as follows:
kubectl create namespace argocd
kubectl apply -n argocd -f https://raw.githubusercontent.com/argoproj/argo-cd/stable/manifests/install.yaml
See here for more information about installation.
Deploy application
Now, we will create an httpbin deployment and service.
kubectl create deployment httpbin --image=kennethreitz/httpbin --port=80
kubectl expose deployment httpbin --port=80
Apply version label
Next, we will assign httpbin deployment the app.kubernetes.io/version label (version label). AutoX will launch experiments only when this label is present on your trigger object. It will relaunch experiments whenever this version label is modified.
kubectl label deployment httpbin app.kubernetes.io/version=1.0.0
Setup Kubernetes cluster with Iter8 AutoX
Next, we will configure and install the AutoX controller.
helm install autox autox --repo https://iter8-tools.github.io/hub/ --version 0.1.6 \
--set 'groups.httpbin.trigger.name=httpbin' \
--set 'groups.httpbin.trigger.namespace=default' \
--set 'groups.httpbin.trigger.group=apps' \
--set 'groups.httpbin.trigger.version=v1' \
--set 'groups.httpbin.trigger.resource=deployments' \
--set 'groups.httpbin.specs.iter8.name=iter8' \
--set 'groups.httpbin.specs.iter8.values.tasks={ready,http,assess}' \
--set 'groups.httpbin.specs.iter8.values.ready.deploy=httpbin' \
--set 'groups.httpbin.specs.iter8.values.ready.service=httpbin' \
--set 'groups.httpbin.specs.iter8.values.ready.timeout=60s' \
--set 'groups.httpbin.specs.iter8.values.http.url=http://httpbin.default/get' \
--set 'groups.httpbin.specs.iter8.values.assess.SLOs.upper.http/error-count=0' \
--set 'groups.httpbin.specs.iter8.values.assess.SLOs.upper.http/latency-mean=50' \
--set 'groups.httpbin.specs.iter8.version=0.13.0' \
--set 'groups.httpbin.specs.iter8.values.runner=job'
The configuration of the AutoX controller is composed of a trigger object definition and a set of experiment specifications. In this case, the trigger object is the httpbin deployment and there is only one experiment, an HTTP performance test with SLO validation associated with this trigger.
To go into more detail, the configuration is a set of groups, and each group is composed of a trigger object definition and a set of experiment specifications. This enables AutoX to manage one or more trigger objects, each associated with one or more experiments. In this tutorial, there is only one group named httpbin (groups.httpbin...), and within that group, there is the trigger object definition (groups.httpbin.trigger...) and a single experiment spec named iter8 (groups.httpbin.specs.iter8...).
The trigger object definition is a combination of the name, namespace, and the group-version-resource (GVR) metadata of the trigger object, in this case httpbin, default, and GVR apps, deployments, and v1, respectively.
The experiment is an HTTP SLO validation test on the httpbin service that is described in greater detail here. This Iter8 experiment is composed of three tasks, ready, http, and assess. The ready task will ensure that the httpbin deployment and service are running. The http task will make requests to the specified URL and will collect latency and error-related metrics. Lastly, the assess task will ensure that the mean latency is less than 50 milliseconds and the error count is 0. In addition, the runner is set to job as this will be a single-loop experiment.
Observe experiment
After starting AutoX, the HTTP SLO validation test should quickly follow. You can now use the Iter8 CLI in order to check the status and see the results of the test.
The following command allows you to check the status of the test. Note that you need to specify an experiment group via the -g option. The experiment group for experiments started by AutoX is in the form autox-<group name>-<experiment spec name> so in this case, it would be autox-httpbin-iter8.
iter8 k assert -c completed -c nofailure -c slos -g autox-httpbin-iter8
Sample output from assert
INFO[2023-01-11 14:43:45] inited Helm config
INFO[2023-01-11 14:43:45] experiment has no failure
INFO[2023-01-11 14:43:45] SLOs are satisfied
INFO[2023-01-11 14:43:45] all conditions were satisfied
We can see in the sample output that the test has completed, there were no failures, and all SLOs and conditions were satisfied.
And the following command allows you to check the results of the experiment.
iter8 k report -g autox-httpbin-iter8
Sample output from report
Experiment summary:
*******************

Experiment completed: true
No task failures: true
Total number of tasks: 4
Number of completed tasks: 4

Whether or not service level objectives (SLOs) are satisfied:
*************************************************************

SLO Conditions                 | Satisfied
--------------                 | ---------
http/error-count <= 0          | true
http/latency-mean (msec) <= 50 | true


Latest observed values for metrics:
***********************************

Metric                     | value
-------                    | -----
http/error-count           | 0.00
http/error-rate            | 0.00
http/latency-max (msec)    | 25.11
http/latency-mean (msec)   | 5.59
http/latency-min (msec)    | 1.29
http/latency-p50 (msec)    | 4.39
http/latency-p75 (msec)    | 6.71
http/latency-p90 (msec)    | 10.40
http/latency-p95 (msec)    | 13.00
http/latency-p99 (msec)    | 25.00
http/latency-p99.9 (msec)  | 25.10
http/latency-stddev (msec) | 4.37
http/request-count         | 100.00
In the sample output, we can see an experiment summary, a list of SLOs and whether they were satisfied or not, as well as any additional metrics that were collected as part of the experiment.
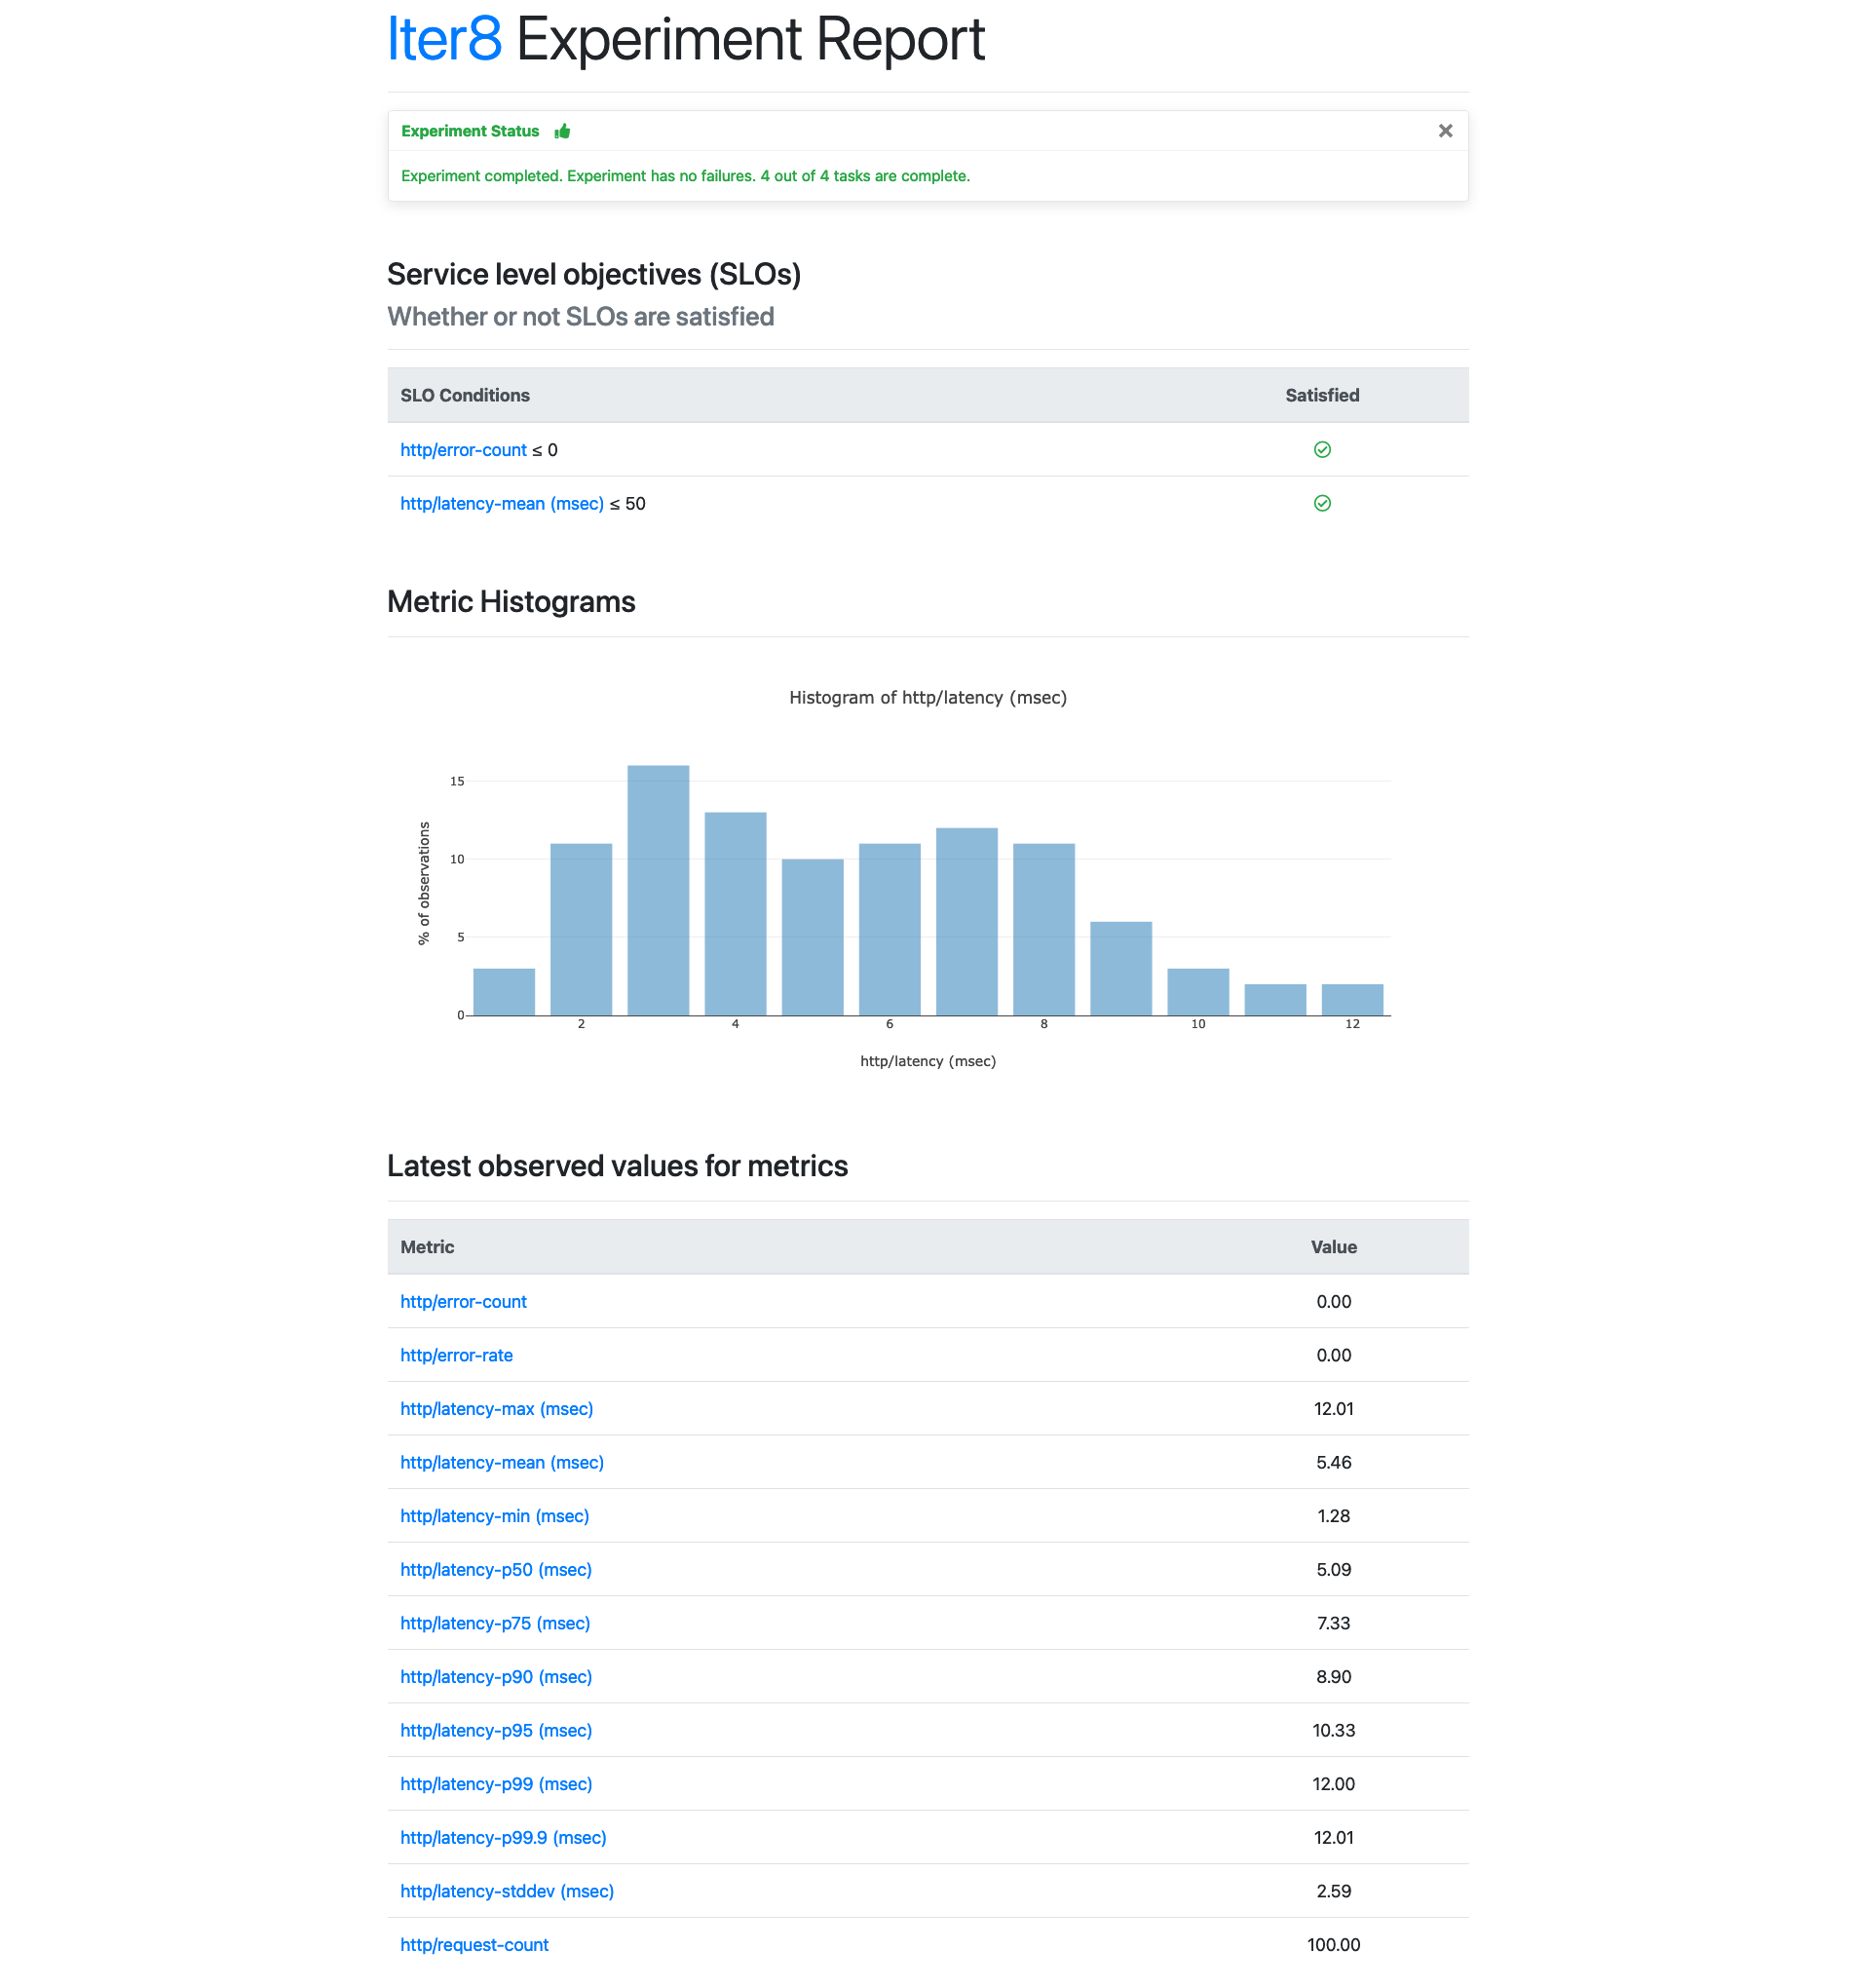
You can also produce an HTML report that you can view in the browser.
iter8 k report -g autox-httpbin-iter8 -o html > report.html
Sample output from HTTP report
Continuous and automated experimentation
Now that AutoX is watching the httpbin deployment, release a new version will relaunch the HTTP SLO validation test. The version update must be accompanied by a change to the deployment's app.kubernetes.io/version label (version label); otherwise, AutoX will not do anything.
For simplicity, we will simply change the version label to the deployment in order to relaunch the HTTP SLO validation test. In the real world, a new version would typically involve a change to the deployment spec (e.g., the container image) and this change should be accompanied by a change to the version label.
kubectl label deployment httpbin app.kubernetes.io/version=2.0.0 --overwrite
Observe new experiment
Check if a new experiment has been launched. Refer to Observe experiment for the necessary commands.
If we were to continue to update the deployment (and change its version label), then AutoX would relaunch the experiment for each such change.
Next steps
Firstly, the HTTP SLO validation test is flexible, and you can augment it in a number of ways, such as adding headers, providing a payload, or modulating the query rate. To learn more, see the documentation for the httpbin task.
AutoX is designed to use any Kubernetes resource object (including those with a custom resource type) as a trigger object in AutoX. For example, the trigger object can be a Knative service, a KServe inference service, or a Seldon deployment.
AutoX is designed to automate a variety of experiments. For example, instead of using the http task, you can use grpc task in order to run an gRPC SLO validation test. Here is the documentation for the grpc task as well as a tutorial for gRPC SLO Validation.
Furthermore, you can add additional tasks that ship out-of-the-box with Iter8, in order to enrich the experiments. For example, you can add a slack task so that your experiment results will be posted on Slack. That way, you can automatically have the latest performance statistics after every update. Here is the documentation for the slack task as well as a tutorial for using the Slack task.
You can also automate experiments that are not from Iter8. For example, a Litmus Chaos chaos experiment is available on Iter8 hub, which can also be configured with AutoX.
Lastly, recall that you can provide multiple groups and experiment specs so AutoX can launch and manage a whole suite of experiments for multiple Kubernetes applications and namespaces.
Clean up
# delete AutoX controller and any experiments started by AutoX
helm delete autox

# delete trigger and service
kubectl delete deployment/httpbin
kubectl delete service/httpbin

# delete ArgoCD
kubectl delete -n argocd -f https://raw.githubusercontent.com/argoproj/argo-cd/stable/manifests/install.yaml